Here is how I did it...I used various materials that are easy to come by. I went to to dollar store and purchased foam boards, white glue, shaving cream, blue colored body wash, bubble wrap, sand paper and then printed out a bunch of pictures from the internet of various ocean creatures that you would find in the three layers of the ocean. I used light blue, medium blue and black colored construction paper for the backgrounds.
Click above picture for labels/experiment.
For the added information like the fisherman with the various ocean jobs and the verses and the list of animals at various levels of the ocean I used parts of the lapbook from the Atlantic Ocean Study on
you could use whatever elements grab you for your project from that unit study. The elements I used I printed out to be 2 to a page which reduced their size down to what you see on the boards.
I don't have a website for the various pictures of ocean life - I just google imaged that and printed a couple that looked good to me.
First we did a little experiment to demonstrate how far light can penetrate the ocean and sustain life. It's noted at the end of the above document, so click above if you would like to do that activity.


 Then the kids all colored the sea life that they wanted to use for their various layer of the ocean and cut them out.
Once they completed the coloring then they added their sand paper that was cut to represent the continental shelf and pasted it onto their top light blue paper. Next they added the appropriate fish to their paper and pasted them on. Lastly, the added the bubble wrap and glued that down over top the sheet of paper. The bubble wrap was to represent the oxygenated/light filled layer of the photic zone.
Next we took gallon plastic bags and filled each one about 1/3 a cup full of blue body wash gel. Then the kids with Mom's help sealed the plastic bag closed properly and began to squish and play with their bag. Once they played for a while they folded the bag over about 2 inches to overlap the back of the second blue paper and taped it to it. Then they flipped over their paper and the gel covered the blue sheet with their ocean animals that had been glued to the front side and it represented the darker less oxygenated/light bathyl zone.
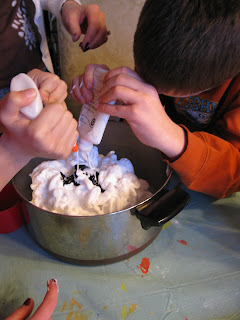
Once those two steps were completed, then they glued down their black construction paper and did NOT add their fish pictures to this layer yet. I got out a large pan and added shaving cream and white glue and had the kids mix it together with their hands - they LOVED this part! Add added a bit of black tempura paint to turn it dark and they continued to mix. I had they take turns 2 at a time because it is a very messy project - so two at a time would play in the mixture and then they would take some of the mixture and added it to to their black construction paper covering all of the paper. Then once their hands were again clean, they gently placed the pictures into the mixture on their paper. Lastly, they labeled and pasted any of the additional documents to complete their project.
Notice how April is standing back....

Special Guest Appearance by our very own Ms. Erynn!!! That made the day extra fun too!!
For our snack, I made miniature seas using rice cakes putting cream cheese that I mixed blueberries into to make blue (although I didn't mix much so it was very light-but better than blue dye!) and pushed in goldfish cracker and starfish crackers. The kids enjoyed that as well!
What a WONDERFUL Wednesday!!!


Next best thing to going to the aquarium! We loved all the all the kinesthetic layers of the ocean Colleen --- thanks for calling me out on the Abyssal Zone.
ReplyDeleteGreat project. I wish I would have found the lesson plans sooner. Will you be selling cycle 2 plans?
ReplyDeleteBlessings,
Toni (CC, Indiana)
Yes Toni, I will be coming out with it by May or sooner. I'm glad you are viewing :)
DeleteI love this. It makes a really great display board.
ReplyDeleteThank you Phyllis! Have a blessed day!
Delete